 (You can probably skip this first part by looking at the included Fla file for
examples).
(You can probably skip this first part by looking at the included Fla file for
examples).This tutorial shows you how to create a simple Guest book in Flash. This Guest book is simple, efficient, fast, and easy to implement. Their are no complicated database or xml issues to worry about. One swf, one script, and one text file. Put it together and you'll have a great Guest book for your site. In this example we use a PHP script but after you understand how it works it should be fairly easy to write the same script in Perl, ASP, or Cold Fusion. With a couple of modifications and some additions to the non-existent administration side you'll be able to create almost anything you want out of it. For a working example of this please visit: http://www.flash-db.com/GuestBookTut/
Included Files:
Theory:
This Guest Book works by storing user entered information in a text file. The script that is used organizes the data according to when it was entered, in a way that the newest entries are always first. All of the entries are separated by a pattern that the script later splits into an array. The array is then manipulated according to commands sent from the Flash movie. In this way we can organize the data that is returned to the flash movie. The script returns a fixed amount of data back to the flash movie at one time (default is 10 entries), making the time it takes to view the entries minimal. Their are quite a few modifications that can be added by further manipulating these array's. Using this technique our simple Text file becomes a database that we can organize, sort, and filter. Best of all it will work on any server as long as you can run some type of server side script and can change the permissions of a text file.
<%BRK%>Add the following ActionScript to the 1st frame of the movie:
NumLow = 0;
NumHigh = 10;
loadVariablesNum ("GuestBook.php?NumLow="+NumLow+"&NumHigh="+NumHigh+"&R="+random(999), 0);
stop();
The first 2 lines set the lower and upper limit of guest book entries to display to their default values of 0 and 10. The next line loads the initial Guest book entries (1-10). These appear when you first open the Guest Book. In this example we are just attaching the needed variables onto the end of the string, you can just as easily remove everything after the ? in the loadVariablesNum function above and use the 'POST' option. For some reason it's an old habit of mine to do it this way when *-testing. You can change the number of entries that appear by changing the values for NumLow and NumHigh. NumLow is the lower limit, NumHigh is the upper limit. For example, if you want to display 20 entries at a time instead of 10 you can change the value of NumHigh to 20.
First we are going to set up the area where the Guest book entries
appear on the screen, along with the 'next' and 'previous' buttons. The
basic layout is shown to the right.
(You can probably skip this first part by looking at the included Fla file for
examples).
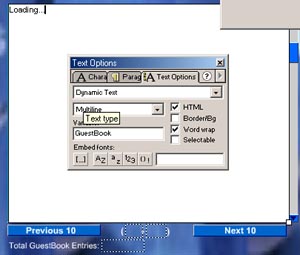
Create a text field named 'Guest Book' as shown in the photo. Make sure to make this a multiline dynamic text box field. Also make sure to check off the HTML and Word wrap checkbox. Enter some default text into this text area - (for example - Loading...). The default text will be replaced as soon as the Guest book entries are loaded.
Create two additional text boxes named 'NumLow' and 'NumHigh', these will be used to tell the user what set of Guest book entries they are currently viewing. Do not check the 'HTML' checkbox off for this one.
Create one last text field called 'TotalEntires' - this is used to show the user how many entries you currently have in your Guest book.
Create a Previous 10 and Next 10 button.
The following ActionScript is located on the Previous 10 button:
on (release) {
	if (NumLow == "0") {
	Guest Book = "No more before 0";
	}
	else {
         NumLow = Number(NumLow) - Number(10);
	NumHigh = Number(NumHigh) - Number(10);
	Guest Book = "Loading Comments Numbered "+NumLow+" to "+NumHigh+" Please Hold";
	loadVariablesNum ("GuestBook.php?NumLow="+NumLow+"&NumHigh="+NumHigh+"&R="+random(999), 0);
	}
}
The first if statement in the above ActionScript is their so that users can not view entries before 0, which would cause an error. If they try to press the previous button while they are viewing entries 0-10 they will see the error message 'No more entries before 0'. The else part is used in most cases. What this does is subtract 10 from both the 'NumLow' and 'NumHigh' variables. The text in the 'Guest Book' text field is changed to 'Loading Comments numbered NumLow to NumHigh' with the next line. Finally we call the script that we are using to display the results we are looking for.
The following ActionScript is located on the Next 10 button:
on (release) {
	NumLow = Number(NumLow)+Number(10);
	NumHigh = Number(NumHigh)+Number(10);
	Guest Book = "Loading Comments Numbered "+NumLow+" to "+NumHigh+" Please Hold";
	loadVariablesNum ("GuestBook.php?NumLow="+NumLow+"&NumHigh="+NumHigh+"&R="+random(999), 0);
}
This is basically the same as the ActionScript for the Previous button except instead of subtracting 10 from the variables 'NumLow' and 'NumHigh' we are adding 10 to them. The script will return a result if the user tries to view more entries then their are. This will be shown later.
The scrolling text box is probably the most difficult to explain. Because this tutorial does not deal with scrolling text boxes I am not going to explain it here. Their is however a great tutorial on this at flashkit. For now you can just use the scrolling text box that is set up in the Fla that comes with the download.
<%BRK%>The main Guest Book entry (or submission) form is shown to the left. This consists of 4 input text boxes and 2 buttons.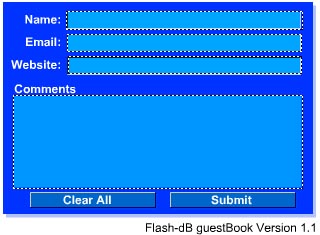 The entry forms are located inside of a movie clip. Their is no need to
give this movie clip an instance name in this case. Also in the Fla, above
this form their is an additional text field named 'Status' - this is used to
display messages to the user when filling out the form and submitting
it.
The entry forms are located inside of a movie clip. Their is no need to
give this movie clip an instance name in this case. Also in the Fla, above
this form their is an additional text field named 'Status' - this is used to
display messages to the user when filling out the form and submitting
it.
The 4 input text boxes are named: Name, Email, Website, and Comments - respectively. The first 3 are single line text boxes. The comments text box is a multi-line input text box. Make sure that you do not check the 'HTML' check box off for any of these. Also it's always a good idea to set the max number of characters (max Chars) that can be entered in these boxes (especially the Comments text box) otherwise people will be able to enter large amounts of text into the comments area. In my example I have the comments limited to 240 characters - you can change yours to whatever you want. That's just one way to check how much data has been entered, you should add other checks to limit the amount of text entered if you feel it's necessary.
The following code is located on the Submit button:
on (release) {
	if (Name eq "") {
		_root.Status = "Please enter your name";
	} else if (Email eq "") {
		_root.Status = "Please enter email Address";
	} else if (Website eq "") {
		_root.Status = "Please enter the URL to your website";
	} else {
		Submit = "Yes";
		NumHigh = 10;
		NumLow = 0;
		_root.GuestBook = "Processing..   Loading New... ";
		loadVariablesNum ("GuestBook.php", 0, "POST");
		_root.Status = "Your entry has been submitted.  You should see your comments appear immediately";
		gotoAndStop (2);
	}
}
The first portion of this code checks to make sure that the fields where filled out. If they where not filled out correctly an error message will appear in the Status Text box.
If everything was filled out successfully the variable Submit is set to 'yes'. This is an important aspect and will be further explained in the PHP script. Then the variables NumHigh and NumLow are set again to their default values of 0 and 10, respectively. The Guest book text field is then assigned a temporary value to let the user know that the entries are being loaded. The next line uses the loadVariablesNum function to send all of the variables in this movie clip to the script which will add the entry to our text file database. After that a success message is shown in the Status text field and the movie clip goes to the second frame where a Thank You message is displayed.
At this point the script is called, where it adds the new entry and returns the new entry as well as the others back to the Flash movie. In this way the user will see his entry appear in the Guest book right after the submit button is pressed.
<%BRK%>The below script is the only one that is needed. The script included in the download has extra comments and other helpful information. After reading over the script, read over the line by line comments located below. That combined with the extra comments in the actual script should give you a good idea on how this script functions. What it basically does is writes to a text file if the variable Submit from the Flash movie is equal to yes, separates the comments into an array then loads that array according to what the values for NumLow and NumHigh are. In this manner we load 10 entries at a time from the text file.
	<?
1)		$Name = ereg_replace("[^A-Za-z0-9 ]", "", $Name);
2)		$Email = ereg_replace("[^A-Za-z0-9 \@\.\-\/\']", "", $Email);
3)		$Comments = ereg_replace("[^A-Za-z0-9 \@\.\-\/\']", "", $Comments);

4)		$Website = eregi_replace("http://", "", $Website);
5)		$Website = ereg_replace("[^A-Za-z0-9 \@\.\-\/\'\~]", "", $Website);

6)		$Name = stripslashes($Name);
7)		$Email = stripslashes($Email);
8)		$Website = stripslashes($Website);
9)		$Comments = stripslashes($Comments);

10)		if ($Submit == "Yes") {
11)			$filename = "GuestBook.txt";
12)			$fp = fopen( $filename,"r");
13)			$OldData = fread($fp, 80000);
14)			fclose( $fp );
15)			$Today = (date ("l dS of F Y ( h:i:s A )",time()));

16)			$Input = "Name: <b>$Name</b><br>Email: <b><u><a href=\"mailto:$Email\">$Email</a></b></u><br>
           		Website: <b><u><a href=\"http://$Website\" target=\"_blank\">$Website</a></b></u><br>Comments:
           		<b>$Comments</b><br><i><font size=\"-1\">Date: $Today</font><br><br>.:::.";

17)			$New = "$Input$OldData";

18)			$fp = fopen( $filename,"w");
19)			fwrite($fp, $New, 80000);
20)			fclose( $fp );
21)		}
22)		$filename = "GuestBook.txt";
23)		$fp = fopen( $filename,"r");
24)		$Data = fread($fp, 80000);
25)		fclose( $fp );

26)		$DataArray = split (".:::.", $Data);
27)		$NumEntries = count($DataArray) - 1;
28)		print "&TotalEntries=$NumEntries&NumLow=$NumLow&NumHigh=$NumHigh&Guest Book=";
29)		for ($n = $NumLow; $n < $NumHigh; $n++) {
30)		print $DataArray[$n];
31)			if (!$DataArray[$n]) {
32)			Print "<br><br><b>No More entries</b>";
33)			exit;
34)			}
35)		}
	?>
Lines 1-3,5: These lines include some regular expressions that remove unwanted characters from the variables. The most important character that we are removing is the colon (:). (If the colon was not removed someone could potentially enter the same pattern that we are using to separate the text file into an array with and cause results to become mixed up). These lines are however optional, you can remove them and the script will still work.
Line 4: This replaces the string 'http://' when it is encountered in a submitted URL. This part is removed so that when we add the 'http://' part back later we do not have two http://'s.
Lines 6-9: These lines are optional. Basically what the stripslashes() function does is to remove slashes that where added to the data when posted from the Flash movie.
Line 10: This line checks to see if the variable 'Submit' is equal to 'Yes'. If it is the script will create a new entry in the database/textfile. If not it will skip this step and move on to the second part of the script. Remember that 'Submit' was set to 'Yes' when the user filled out the entry form and submitted it.
Line 11: The variable $filename is given the value of 'GuestBook.txt' which is the text file that we will be writing the new guest book entry to.
Line 12: Opens the file 'GuestBook.txt' for reading.
Line 13: Reads in the contents of 'GuestBook.txt' and assigns that value to the new variable '$OldData'.
Line 14: Closes the file that we previously opened.
Line 15: Gets the current date and time from the server and assigns it to the variable $Today.
Line 16: Formats all of the values entered by the user into a string. Notice how we add the html formatting at this point. Also notice the last part of this string that contains the pattern .:::. - we will be using that pattern to separate the text files into an array that we can split up and work with later. That is the most important part of this script.
Line 17: This line takes the New Input and puts it in front of the old data from the text file. In this way the newest results are always first.
Line 18: Opens the file 'GuestBook.txt' for writing.
Line 19: Writes the new data to that file. Notice the limit of '80000'. This is a fairly large number and you may want to reduce it.
Line 20: Closes the file for writing.
Line 21: Ends the if Statement that we started on Line 10.
Line 22: The variable $filename is given the value of 'GuestBook.txt' which is the text file that we will be writing the new guest book entry to. (Basically the same as on Line 11 although it's needed again because this script has a duel purpose).
Line 23: Opens the file 'GuestBook.txt' for reading. As above this line is basically the same as Line 12. Because this script is not always used for adding a new entry we need to use it again.
Line 24: Reads in the contents of 'GuestBook.txt' and assigns that value to the new variable '$Data'.
Line 25: Closes the file that we previously opened.
Line 26: Splits the data that we just retrieved ('$Data') from the text file into an array. The string is split whenever the script encounters the pattern '.:::.' - remember we added this after every new entry on line 16. Now we have an array of strings split by the specified pattern in the variable $DataArray. We can access any of these substrings in the array by specifying $DataArray[i]; where i is the specific Guest book entry number.
Line 27: This line just counts the number of times we matched the pattern '.:::.' in the previous line. This corresponds to the current number of Guest Book entries that are in the Guest Book. We send this value back to the flash movie so we know how many people have signed the Guest Book.
Line 28: This formats the first part of the string we send back to the flash movie. Notice how this line ends with 'GuestBook=' we will be adding the Guest Book entries with the next couple of lines.
Line 29: This sets up a For Loop. We specify the starting value to be equal to NumLow (remember back to the flash movie). Then we keep looping (increasing $n by 1) while $n is less then NumHigh.
Line 30: Prints the corresponding Guest Book entry from the array to the string we are returning back to the Flash movie. By limiting it to only returning 10 at a time we increase it's speed and manageability.
Line 31: Checks to see if their is a value for that Guest Book entry.
Line 32: If the Guest Book entry is empty we print out a message telling the user - 'No More Entries'.
Line 33: At which point we exit the loop.
Line 34: Closes the If loop - (The one that checks to see if their are any more entries).
Line 35: Closes the For Loop.
This script will not work in some earlier versions of Netscape 6 (along with a lot of other scripts) - Netscape fixed this problem in later releases 6.1, 6.2.
On NT/2000 servers their will be a few small changes you will need to make for this to run properly. Also it is more difficult to change the permissions of a file on an NT server if you are not the administrator. Sometimes online hosting services will let you do this yourself through a web management application, or you will have to request that they do it for you.
With the Release of PHP 4.1.0 Their have been some additional updates that
should be taken into consideration for future use of PHP. In previous versions all PHP variables where available in whatever form they came to the script in, and where
automatically declared in the script. For example if you sent the script the variable 'Name' from Posting the
contents of a form, attached to the end of a URL string, from a cookie, as a session variable, etc that variable
is/was automatically available for use in the script (as long as
register_globals was turned on). With the release of PHP 4.1.0 you will now have to
grab the value from a special array variable:
$_GET - contains form variables sent through GET
$_POST - contains form variables sent through POST
$_COOKIE - contains HTTP cookie variables
$_SERVER - contains server variables (e.g., REMOTE_ADDR)
$_ENV - contains the environment variables
$_REQUEST - a merge of the GET variables, POST variables and Cookie variables.
$_SESSION - contains HTTP variables registered by the session module
For example in the above script. Instead of being able to just use the variable 'Name' from the Flash form - we
would have to use something like - <? $Name = $_POST["Name"]; ... .. ?> - Fortunately
the above script used in this tutorial still
work for now. But it might be a good idea to get into the practice of using the new method. It is also a more
secure method of programming with PHP. To learn more visit www.php.net.
(Just thought I would mention this, as I recently completed a project on a
NT server that had register_globals turned off and had just installed PHP 4.1.0,
that and other reasons caused me to pay special attention to this new method). Sorry if I botched the explanation.
1) Create a directory called 'GuestBook' - or something similar on your server.
2) Upload the PHP script (GuestBook.php), the swf (GuestBook.swf), and the text file (GuestBook.txt) to this directory. Remember the GuestBook.txt file is initially empty.
3) Change the permissions of the 'GuestBook.txt' file to 777. You can do this by using Telnet or your FTP program. With WS_ftp you can right click on the file once uploaded and select 'chmod' - Just check all the boxes off.
4) That's it. It should be up and running if you followed those 3 steps.
<%BRK%>1) Are you sure that you can run php scripts on your server? Check with your systems administrator to make sure.
2) Have you changed the permissions of the text file 'GuestBook.txt'. Make sure their set so you can write to them.
3) Check to see if you have any errors in your scripts. Open up the script in your browser window by typing in the full url to the script on your server - If you receive an error message, then you've got a small syntax error in your script. It's probably a missed ';' or a similar error. Usually this reports a line number along with the error, this should give you a good start on where to find the error. If their is a blank screen or a success message then the script is working.
4) Verify all paths used and try to visually track the variables from the beginning to the end of the process.
This tutorial and script was created with simplicity in mind. It's my hope that everyone can use this tutorial. Once you have an understanding of the script it should be possible to develop new uses for it - such as an updateable news section, links or directory's, updateable articles section, and a million other items. Hopefully at the very least you'll be able to add a Guest Book to your site after reading over this.
http://www.flash-db.com/GuestBookTut/
-Jeffrey F. Hill
www.flash-db.com